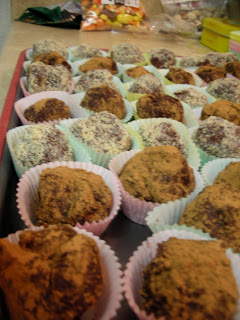
While we are not including them in our wedding menu, I think they are perfect for any elegant affair (or casual affair, or lunch in the office for that matter). You can bet, at some point I will be a hero when I show up with a box of these to a party!
Now, because sharing is caring, and I care about the Hive a whole lot, I am going to share my process for making these bad boys.
First I turned to the internet for a recipe. There are about a bajillion choices, I went with this one.
If you don't feel like clicking the link or you really like pictures, please follow along!
First you need:
20 oz Chocolate (The all knowing internet said I needed good quality chocolate that was at least 60% coco)
1 1/4 Cups heavy cream
*The rest of the ingredients were not consistently called for from other recipes*
Pinch of Salt
1/2 a vanilla bean scraped
2 1/2 oz Butter
I used a mix of 3 different kinds of chocolate including these two and a generic "Dark" that I bought from the bulk section of the grocery store.
This next step was honestly the most time consuming part of the whole deal. Chop up the chocolate. The finer the better. Usually I recommend using a serrated knife for chopping chocolate but I got some AMAZING new knives for Christmas and I used the chef's knife.
After chopping dump chocolate into a large glass bowl.
Next, bring the cream, salt and vanilla to a boil.
I do not have a picture of this because, as soon as it boils, you should take it off the heat and pour it over the chocolate. In the directions I linked to above it says you should pour the vanilla bean into the chocolate and then fish it out later. However that seemed messy so i plucked it out right before I poured the cream onto the Chocolate.
Next you let it sit for 3 minutes. If I did it again I would add the butter as it sits so the butter melts better.
After the three minutes you start to stir. Little circles at first, getting bigger and bigger. Keep stirring until your bowl looks like this:
At this point you have two choices, you can A) proceed with making Truffles or B) Stick your whole face in this bowl and eat the contents. After much internal struggle I decided to go with option A.
I should note, at this point, you have ganache.
Place plastic wrap on the chocolate and pop it in the fridge for 2 hours or more.
Now comes the messy part. After you have let the ganache set up, pull the bowl out of the fridge. I used a spoon to scoop it out and then rolled them into little balls. I them rolled the balls through crushed almonds or coco powder.
The last step was really more for show than anything. I put the truffles into little paper cups (mini muffin sized) and put them back in the fridge.
Let's just say mine was gone in one amazing, creamy, melty bite and it took a lot of begging for Mr. Aardvark to pause long enough to get this shot.
There are TONS of variations and I think next time I will add a splash of liqueur or some mint.
Have you discovered any amazing and/or amazingly easy treats during wedding planning?


No comments:
Post a Comment